Thursday, January 29, 2009

Seed Starting Round 2 Scorecard

Well, this round of Seed Starting did not go as well as the 1st round. 

I was only able to get 3 Cherry Tomato seedlings and 1 Winter Melon seedlings.  This is a germination rate of 16.7%

I actually got a decent germination rate from my Cherry Tomato seeds.  Out of 6 seeds, I got 3 seedlings (50% germination).

However, I only got 1 of 12 Winter Melon seeds to germinate and none of the two Chinese Pumpkins nor the two Kabocha seeds to Germinate.

I think the problem is that the APS-24 unit is too shallow.  Since the APS-24 is only 2 inches deep, I can only cover the seeds with about 1/4 of soil.  I think the seeds need to have more soil on top and below.   

Last year, I used the APS-6 units to germinate the bigger seeds (Winter Melons and Pumpkins).  I wanted to save space and try to germinate in the APS-24.  

Obviously, that was a bad decision.  

Seed Starting Round 3

I am going to try again to start my Winter Melon, Pumpkin and Kabocha seeds.  This time I will use the APS-6 units.  These units are 4" deep (twice the depth of the APS-24 units).  This will allow me to cover the seeds with approximately a half inch of soil. 

I am using Miracle Grow Seed Starting for the bottom 3.5 inch of the cell.  I am topping off with the top 0.5 inch with the Germinating Mix from Gardener's Supply Company.   The Miracle Grow Seed Starting Mix is half the cost and much easier to obtain (at my local Home Depot) than the Germinating Mix, which I can only get via mail order.

I am utilzing 3.5 APS-6 units in this go around.  

One of the APS-6 units is half filled with the 3 Cherry Tomato seedlings that emerged from Seed Starting Round 2.  I filled the remainder of the APS-6 unit with more Cherry Tomato Seedlings.  I still don't have enough Cherry Tomato Seedlings for the season.  I want 2 each of Sun Sugar, Sun Gold, Sun Cherry ES, Sugar Snack, Super Sweet 100 and Sweet Baby Girl

The other 3 APS-6 units I use for Chinese Pumpkin, Kabocha and Winter Melon seeds.

This is a summary of the seeds that I planted:

Name Type SourceQty
Sun Sugar Cherry Tomato www.naturalgardening.com1
Sun Cherry ES Cherry Tomato www.evergreenseeds.com1
Sweet Baby Girl Cherry Tomato www.parkseed.com1
Oblong 114 Winter Melon www.evergreenseeds.com2
Round 287 Winter Melon www.evergreenseeds.com2
Long Giant 386 Winter Melon www.evergreenseeds.com2
Long Melon Winter Melon My Own Seed (Grew Last 2 Years)4
Mother Melon Winter Melon My Mother (Asian Supermarket)4
Kabocha Kabocha My Mother (Asian Supermarket)2
Chinese Pumpkin Pumpkin My Own Seed (Grew Last Year)2


Here is a picture of the 4 APS-6 units under the Grow Light

Hardening Off Seedlings

To make room for the APS-6 seed starting units, I have had to start hardening off my Cherry Tomato and Winter Melon seedlings.  

 
I have 7 Cherry Tomato seedlings and 2 Winter Melon seedlings.  I plan to put them out in the sun for 3 hours the first couple of days.  I will put them out for the full day (~ 7 hrs of sunlight) afterwards.

I will take them inside at night.   I won't let them overnight outside until March.

Sunday, January 25, 2009

How much does it cost to run a Grow Light?

My Grow Light enables me to start my seeds two to three months earlier than I would otherwise.  This means that I can eat Cherry Tomatoes in May and have bigger size Winter Melons and Pumpkins.

However, the Grow Light is cheap.  In addition to a couple of hundred dollars it cost me to buy my Grow Light system (4 T5 bulbs, each 4 feet long) ,  there is also the monthly charge for electricty.  After a very short while, the monthly costs can quickly exceed the original cost of the Grow Light.

Using a device called the Kill-A-Watt , I can measure how much electricty my Grow Light uses. 

When I connected the Grow Light to the Kill-A-Watt, I found the Grow Light costs $0.0483 per hour to run.  That's less than a nickel an hour.  That may not seem like a lot, but if I were to run the Grow Light for 24 hours per day, 7 days a week, it would cost me $34.78 a month or $423 a year!!!

I only leave the Grow Light on for 12 hours a day (6:30pm to 6:30am)  and I only use it in January and February,  so my annual cost is only $34.78.  Once March comes, I can put the seeds outside and they germinate just fine.   Similarly, I can put the seedlings outside in March without any problems.

There are also cheaper ways to run the Grow Light.  I could have gone with 2 bulbs and/or with 2 foot long bulbs.  This would have cut my monthly cost down by 50% to 75%.  

Alternatively, I could forego the Grow Light and just buy Cherry Tomato plants from the local nursery and start the Winter Melon and Pumpkin seeds in March.  But I find that the local nurseries don't stock the Cherry Tomato plants that my family likes to eat and I like having huge Winter Melons and Pumpkins.  I am willing to pay $35 a year for that luxury.  Of course, if I hadn't already spent the money on the Grow Light, I might feel differently.


Saturday, January 24, 2009

Algae

Algae is definitely starting from the edge of the APS units where the capillary mat meets the water source. 

The picture to the left shows the capillary mat of the APS-6 unit that was holding the Winter Melon seedlings.  This is only have 2 weeks of use.

This defintely cuts down the usefulness of the APS units.  They are very convenient to use.  I only have to water once every few days.  The APS-24 units are great for germinating seeds.  But Algae just grows too quickly.  I don't know if this is artifact of how the APS unit is put together or if all self-watering containers have the same problem.

Seedlings Under Grow Light

This is a picture of the seedlings under the grow light.  Both of the APS-6 units have been removed and all of the seedlings are in 6 inch round containers.  

Winter Melon Seedling Update

I transplanted the three Winter Melon seedlings into 6 inch diameter round containers.

As you can see from the picture to the right, one of seedlings is no longer a seedling but a plant.  These three germinated within two days of each other.  I have never seen a Winter Melon seedling grow so fast.

This plant has grown too tall to put under the grow light.  The heat from the lamp will burn the leaves, if the leaves are within an inch of the bottom of the light bulbs.  I had to move this plant to the side.  Unfortunately, the plant no longer gets any direct light.  

Tomorrow, I need to transplant the plant outside.  I hope it survives.  The worst of winter is over in Southern California.  Night time low temperatures will be above 45 degrees F from here on out.

The other two seedlings are right on track for transplanting outside in a few more weeks.   I'll start hardening them off next weekend by bringing them outside for a few hours during the day.

Cherry Tomato Seedling Update

The Cherry Tomato seedlings are growing.   They have tripled in size in the 6 days since I have transplanted them into the APS-6 unit (compare the top and bottom on the picture to the right).  

However, the seedlings are leggy.  See how high the leaves are from the soil mixture.  

At the rate the seedlings are growing, they will reach the bottom of the grow light in a couple of days.  So, I needed to transplant them into a different container.

I use 6 inch diameter round containers as my next stage.  These containers require me to water the seedlings on a daily basis.  The APS-6 (and APS-24) have a capillary mat and water source, so I just need to keep the water tray filled to an adequate level every few days.

 One advantage of transplanting the seedlings again is that I can bury the seedlings under more soil.  This makes the seedlings less leggy and encourages deeper roots, which will make the plants healthier in the long run.

I need to start hardening off the plants soon. Unfortunately, it has rained the entire day and the forecast is for more rain in Southern California in the next week.

Sunday, January 18, 2009

Seed Starting Round 2

Today, I started a second set of seeds in my APS-24 unit.  Yesterday, I dumped the contents of the ungerminated cells and sterilized the APS-24 with a bleach solution overnight to kill any Algae.  I used a different water tray and a different capillary mat, so that I can keep Algae away for as long as possible.  Only the styrofoam container of the APS-24  is reused.

Since I had a very good germination rate of Cherry Tomatoes in the first set of seeds, I changed the mix of seeds to have more Winter Melon seeds and fewer Cherry Tomato seeds. I only want to plant 11 Cherry Tomatoes and I already have 7 Cherry Tomato seedings.  

I planted 3 Cherry Tomato Seeds,  2 Chinese Pumpkin Seeds, 2 Kabocha Seeds, and the rest Winter Melon Seeds.

Below is a picture of my APS units under the grow light. I arranged the two APS-6 units to be in the center so that they get the most light.  I put my fast growing Winter Melon seedling on the side, but still under the light.  Finally, since there was no more room under the grow light, I put the APS-24 seed starting tray on the side away from the light.  Direct light is not essential for seeds to germinate,  just the right temperature. When seedlings emerge,  I will have to rotate the APS-6 units by 90 degrees so that I can put the APS-24 under the light.


Saturday, January 17, 2009

Transplanting Seedlings from APS-24 to APS-6


Transplanting a seedling from the APS-24 is very easy.  There is a hole at the bottom of the cell that is used to connect the soil mix with the capillary mat so that water can transfer.  Just stick your finger through the hole and push.  The cell pops out and the moisture in the soil mix enables the soil mix to retain the shape of the cell.

Then it is a matter of placing the cell into the APS-6 unit and putting soil mix around the cell so that the seedling is in the middle.

Ease in transplanting is one of the main reasons I use the APS system despite the problems I have with Algae growing in the unit.


Fast Growing Winter Melon Seedling

The seedling that emerged from the Winter Melon seed that I got from my Mother-In-Law is really fast growing.  The picture below shows snapshots of the seedling in the first 8 days after germination, during which I had to transplant it twice because it outgrew the container.

On Day 1, I transplanted the seedling from the 2 inch APS-24 cell  to the 4 inch APS-6 cell.  By Day 4, the 1st true leaf emerged and by Day 6, the seedling was almost touching the grow light. 

I had too stop using the grow light and take the seedling outside.  Fortunately the weather in Los
 Angeles this week was warm (70 to 75 degrees F in during the day).  By Day 8, the seedling had outgrown the APS-6 and I had to transplant it into a 6-inch diameter round container.

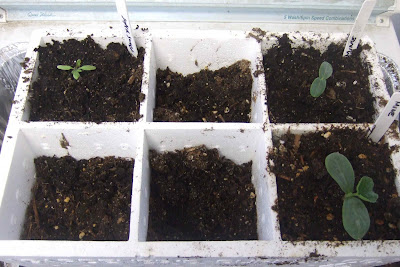
This is the fastest I have ever had a Winter Melon seedling grow.  At this rate, I will have to transplant the seedling into the ground by February 1 (about 1 month earlier than I planned).

One of the other winter melon seedlings is growing at a much more typical rate. The picture on the right  shows the seedling 6 days after germination.  The height is about 1/3 of the height of the fast growing seedling.


Germination Scorecard

After two weeks, I have 7 tomato seedlings, 3 winter melon seedlings and 0 pumpkin seedlings.  This is an overall germination rate of 42%, which is lower than the 50% rate that I was hoping for.
I transfered the seedlings from the APS-24 to the bigger APS-6 and dumped the left over ungerminated cells.

I was not going to get anymore seeds to germinate because Algae had formed on the APS-24 (see the dark green layer on the surface of the cells in the picture).  The Algae started appearing about 4 days ago and the last seedling emerged 2 days ago.

Interestingly, all of the germinations occurred on the upper 2/3rds of the APS-24 unit.   I got 10 seeds to germinate in the upper 16 cells of the unit for a germation rate of 63% and 0 seed to germinate in the lower 8 cells of the unit.  The upper 16 cells are furthest away from where the capillary mat meets the water source, so it could be that the bottom 10 cells got too wet and the Algae got into the soil before the seeds could germinate.  I will see in the next set of seed starts if this trend holds true. If it does, I will change the way I use the APS-24 unit.  

This is the breakdown of the tomato seedlings:
Sun Sugar (1)
Sun Cherry ES (1)
Sun Gold (2)
Sugar Snack (1)
Super Sweet 100 (2)

This is the breakout of winter melon seedlings:

Long Melon (2)
Mother In Law (1)
Below are pictures of the seedlings after they had been transplanted into APS-6 units.


Saturday, January 10, 2009

First Seedling


This morning, I found that one of my Mother-In-Law's Winter Melon seeds germinated and produced a nice seedling.  

It took 6 days for this seed to germinate.  I expect more seedlings to emerge over the next 3 to 4 days.

Since this is a Winter Melon seedling, I had to transplant it right away.  The APS-24 cell is only 1.5 inches tall and from past experience, I know that the roots of the Winter Melon and Pumpkin seedling are quite long.  With the tomoto seedlings, the roots  do not grow as fast and I typically leave them in the APS-24 cell for several days.

When I lifted the APS-24, I saw roots dangling from the bottom of the cell.  If I had waited another day, the roots would have started growing into the capillary mat.  Once that happens, it is almost impossible to transplant the seedling without damaging it (i.e., need to cut the roots), and then I would have to remove the left over roots from the capillary mat.  

I transplanted the Winter Melon seedling into an APS-6.  I used generic potting mix that I got from my local garden store.  It cost me $4 for a 8 quart bag.  In contrast, it cost me $12 for a 9 quart  bag of Gardener's Supply Germinating Mix when you include shipping costs.

I filled each of the 6 cells halfway with the potting mix so that the APS-6 unit stays firmly on the capillary mat.  I then transplanted the seedling into one of the cells.  

The nice thing about the APS-24 unit is that the cell pops right out when I push my finger through the hole in the bottom.  Moisture keeps the cell intact so that it is easy to just drop the seedling into the APS-6 unit and fill with potting mix around it.


Sunday, January 4, 2009

Seed Starting

Today, I started my seeds for my Winter Melons, Pumpkins and Cherry Tomatoes. I hope to have the plants in the ground by March 1.  My goal is to have Cherry Tomatoes ready to eat by Memorial Day, the Winter Melons ready by 4th of July and the Pumpkins ready in August.

I use the APS seedstarting kit from  Gardener's Supply Company . I also use the Germinating Mix from Gardener's Supply Company. I have tried other seed starting mixes but I always go back to this Germinating Mix. I find that finely crushed vermiculite mixed with sphagnum peat in this mix gives me the  best medium for starting seeds.

I have one APS-24 and four APS-6 units. I used the APS-24 for starting seeds and I transfer to the APS-6 units when the seedlings emerge. I then transfer to either 4-inch square or 6-inch diameter round containers before finally putting the plants into the ground. I could start the seeds in the APS-6 units but I find that I use too much of the Germinating Mix when I do this. Instead I used the cheaper soil-less potting mix that I can get at my local gardening store for the APS-6 units.

I planted 2 Chinese Pumpkin seeds, 2 Kabocha seeds, 10 Winter Melon Seeds, and 10 Cherry Tomato seeds. The APS-24 is arranged into 24 cells with 6 cells in each of 4 rows. This is my seed arrangement in the APS-24:

This is where each seed came from:

Sun Sugar Cherry Tomato www.naturalgardening.com
Sun Cherry ES Cherry Tomato www.evergreenseeds.com
Sun Gold Cherry Tomato www.naturalgardening.com
Sugar Snack Cherry Tomato www.naturalgardening.com
SuperSweet 100 Cherry Tomato www.tmseeds.com
Mother Kabocha My Mother (Asian Supermarket)
Chinese Pumpkin Pumpkin My Own Seed (Grew Last Year)
Long Melon Winter Melon My Own Seed (Grew Last Two Years)
Mother-In-Law Winter Melon My Mother-In-Law (Asian Supermarket)
Oblong #114 Winter Melon www.evergreenseeds.com
Long Giant #386 Winter Melon www.evergreenseeds.com
Round #287 Winter Melon www.evergreenseeds.com

I have no pictures for the Winter Melon seeds from my Mother-in-Law.  She got the seeds from a melon she bought from a local Asian Supermarket.  Similarly, I do not have pictures for the Kabocha seeds that my Mother gave me (also from an Asian Supermarket).  I guess I will find out how they look this summer when the plants start producing fruit.

I took seeds from one of the Chinese Pumpkins I grew this past year.  I also am using seeds from a Winter Melon that I grew for the past two years.  Both the Chinese Pumpkin and the Winter Melon plants are prolific producers.

I added 6 parts water to 9 parts of the Germinating mix into a large container.  I used an 8 oz plastic yogurt cup as my scoop.  I used 15  scoops of Germinating mix and 10 scoops of distilled water.  I use distilled water because I want to make as sterile an environment for the seeds to germinate as possible.  

Even with this, I have problems with Algae growing in the APS units.  The problem with the APS units is that all of the cells in the unit share a common water supply.  Consequently, if Algae forms in one cell, it quickly moves to adjacent cells.  This is one reason why I transfer the seedlings into another container as quickly as possible.  I also wash the APS units with bleach between uses.

I fill each cell in the APS-24 with the germinating mix upto 3/4ths full.  I then drop the seed in the middle of the cell and fill the rest of the cell with germinating mix.  As you can tell from the picture below, the Chinese Pumpkin and Kabocha seeds are quite large in comparison to the cell.  This is the first time I have tried to grow seeds this large in the APS-24.  Hopefully, it will turn out well.
I use a grow light that I bought from  Better Grow Hydro .  It is a Tek-Light System with four T5 bulbs each four feet long.  I chose a T5 system because it gives the best light spectrum for the amount of energy that it uses.  Each T5 bulb uses 54 watts.  

The seeds need to be in a warm environment otherwise they will not germinate.   I keep the grow light in a storage room that is detached from the main house.  The room has no insulation, so at night it can get very cold.  I keep the grow light on 12 hours a day, from 7:30pm to 7:30am.  This way the heat from the bulbs helps keep the APS-24  unit warm at night.  Otherwise, I would need to use a heating mat to keep the unit at a nice temperature.

As you can see from the picture below, I elevate the APS-24 unit so that it is within an inch of the light.  This maximizes the both the energy in the light spectrum and also the heat given off by the bulbs.

I get about a 50% germination rate with the APS-24.  It typically takes a 7 to 10 days for seedlings to emerge.  Hopefully, by this time next week, I will have some seedlings.